Introduction
Ever since I started playing with weather stations over 10 years ago, i’ve always been fascinated by the software that runs them. I started years back with WView, which was C based and really not all that well optimized but man was it stable! Then when it stopped development, I migrated to WeeWX which has been an absolute godsend for running my stations. Not only is it built in Python so easy for me to understand what it’s doing, but it also has a huge community around it with plugins for just about data source/destination you could think of.
While WeeWX is great, it does leave a bit to be desired sometimes. For example, these are some of the stock visualizations that come with it.

But what if you wanted something else? Something that maybe you are already using? What about something like Grafana?
Chances are if you are already using Grafana, you are probably running it locally with something like Home Assistant also piping into it. But what if you aren’t? What if you want something cloud based where you can also modify cloud resources, or other business metrics as well as weather data? If so, this blog is for you and you should read on.
Setting up the Prereqs in WeeWX
First off, i’m doing this on a Raspberry Pi (Buster 10) running WeeWX 4.8.0. Your configuration may vary of course, but I tested it on another setup running the latest Ubuntu on an EC2 instance and the latest WeeWX and it seemed to work fine.
We will be using this plugin for WeeWX: https://github.com/matthewwall/weewx-mqtt
Get started by setting up the downloading the package and running the installer. This will modify the weewx.conf file with a basic configuration.
Setting up the Prereqs in AWS
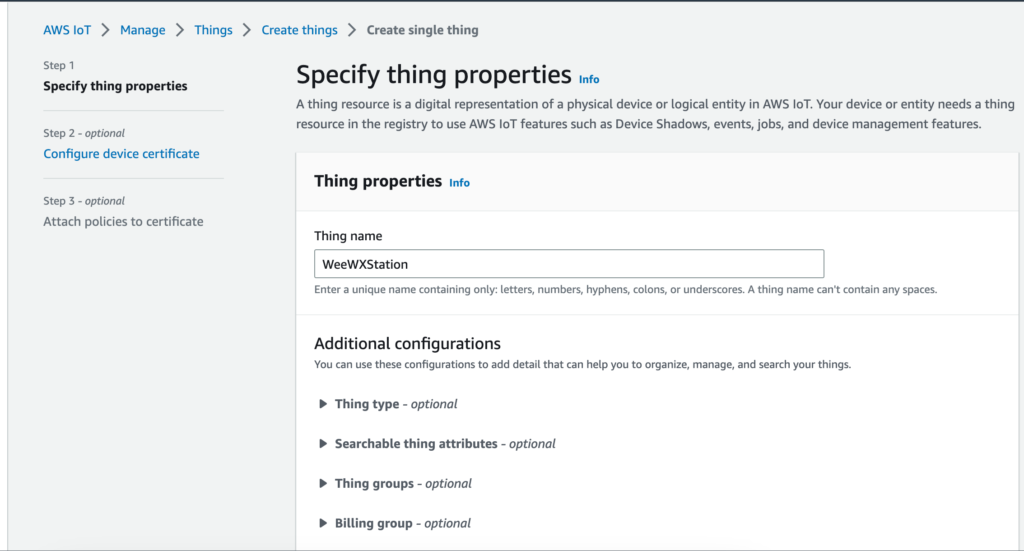
First we’ll navigate over to the IoT Core Console and Create a new thing.
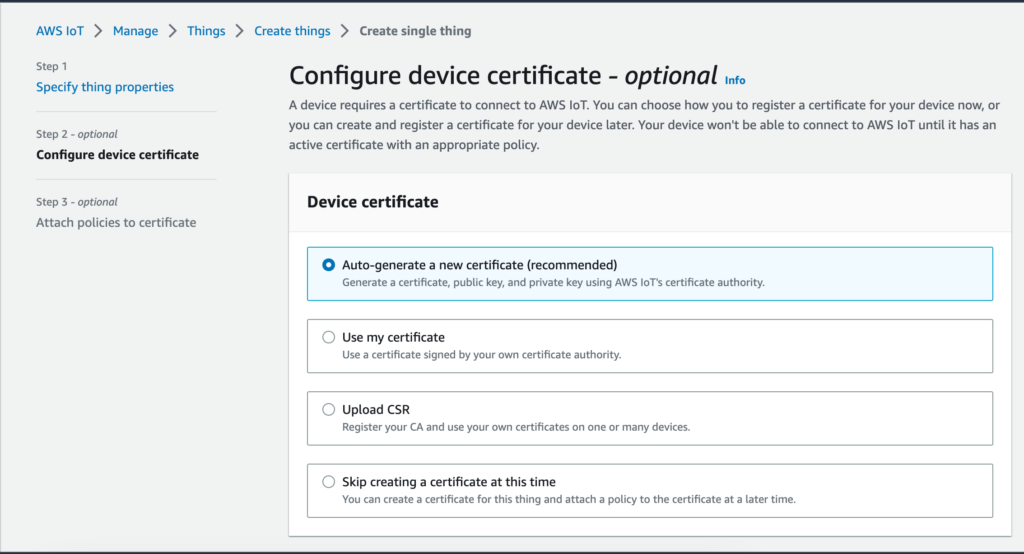
Now we’ll Configure the certificate. We’ll have IoT Core set up the cert for us.
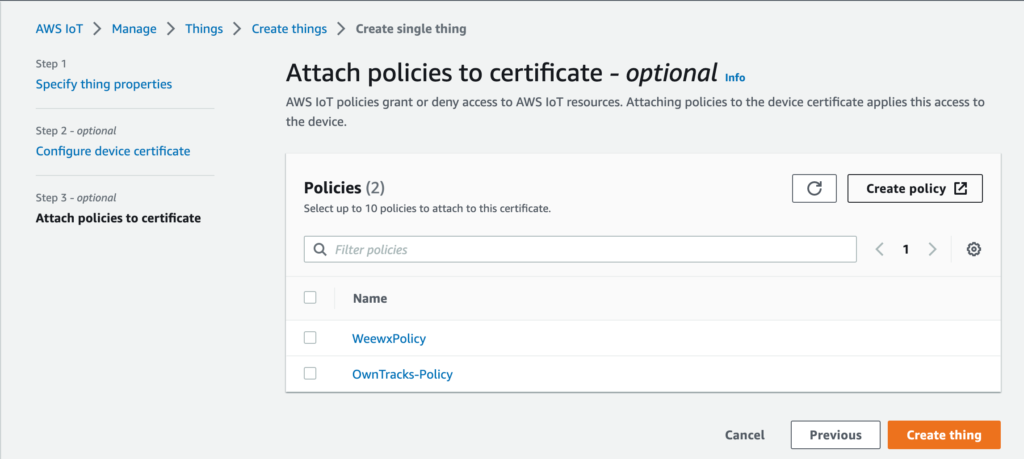
Now we’ll create our policy. The policy will dictate what devices can connect to IoT Core and what topics they can send to. Let’s do “Create policy”
Configure the new policy with the following json, of course replacing <account> with your account number:
{
  "Version": "2012-10-17",
  "Statement": [
    {
      "Effect": "Allow",
      "Action": "iot:Connect",
      "Resource": "arn:aws:iot:us-east-1:<account>:client/weewx_*"
    },
    {
      "Effect": "Allow",
      "Action": "iot:Publish",
      "Resource": "arn:aws:iot:us-east-1:<account>:topic/weather*"
    }
  ]
}
Now you can create the Thing, and download the certificates. We need the device cert, the private key, and the root ca. You also need to download the public key, but we won’t be using it.
Once you’ve downloaded the certs you can click “Done” and we are finally ready to configure our WeeWX config.
Finally before we leave the AWS Console, go to the IoT Core Console, navigate to “Settings” and grab the “Device data endpoint” which is the URL we’ll be using with WeeWX that tells us where to send our data.
Setting up WeeWX with certs
Back on our WeeWX instance, let’s create a folder for our certs. I created this in /etc/weewx/certs to make it easier for the conf file to read it. Now we’ll create the files. This is what I named my files. You can name them whatever you want as long as it’s consistent with your weewx.conf file. Once the files are created, copy/paste the contents of each of your cert files into the appropriate file.
root@PiAware:/etc/weewx/certs# ls -alh
total 20K
drwxr-xr-x  2 root root 4.0K Jan 31 19:53 .
drwxr-xr-x 11 root root 4.0K Jan 29 18:35 ..
-rw-r--r--  1 root root 1.2K Jan 29 18:29 cert.crt
-rw-r--r--  1 root root 1.7K Jan 29 18:28 private.key
-rw-r--r--  1 root root 1.2K Aug  8 19:29 rootca.pem
Now we’ll update the weewx.conf file. It’s a pretty simple config
    [[MQTT]]
        server_url = mqtts://<endpoint url>:8883/
        topic = weather
	aggregation = aggregate
	[[[tls]]]
		ca_certs = /etc/weewx/certs/rootca.pem
		keyfile = /etc/weewx/certs/private.key
		certfile = /etc/weewx/certs/cert.crt
Once this is done, you can restart weewx and verify messages are getting through.
Verifying data flow
Navigate back to AWS IoT Core console, and open up “MQTT test client” and subscribe to “weather” as the topic
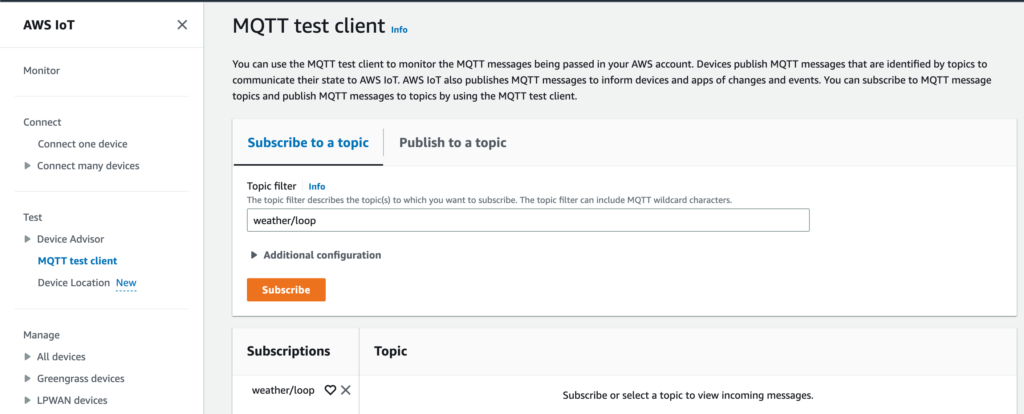
After a short time, you should see entries coming across. Here is an example of one of mine:
{
  "monthET": "0.0",
  "barometer_inHg": "30.417",
  "outHumidity": "63.0",
  "inDewpoint_F": "22.4014329174",
  "windGust_mph": "0.0",
  "dayET": "0.0",
  "interval_minute": "1.0",
  "highOutTemp_F": "17.4",
  "dewpoint_F": "6.8950371838",
  "consBatteryVoltage_volt": "0.89",
  "wind_samples": "20.0",
  "rain_in": "0.0",
  "insideAlarm": "0.0",
  "lowOutTemp_F": "17.3",
  "sunrise": "1675171500.0",
  "hourRain_in": "0.0",
  "cloudbase_foot": "3302.76427641",
  "heatindex_F": "17.3",
  "outsideAlarm1": "0.0",
  "soilLeafAlarm2": "0.0",
  "outsideAlarm2": "0.0",
  "altimeter_inHg": "30.3231865786",
  "forecastRule": "9.0",
  "dayRain_in": "0.0",
  "rainAlarm": "0.0",
  "windrun_mile": "0.0",
  "yearRain_in": "2.16",
  "outTemp_F": "17.3",
  "stormRain_in": "0.0",
  "windchill_F": "17.3",
  "inHumidity": "19.0",
  "extraAlarm1": "0.0",
  "extraAlarm2": "0.0",
  "extraAlarm3": "0.0",
  "extraAlarm4": "0.0",
  "extraAlarm5": "0.0",
  "extraAlarm6": "0.0",
  "extraAlarm7": "0.0",
  "extraAlarm8": "0.0",
  "humidex_F": "17.3",
  "appTemp_F": "11.3358263051",
  "rainRate_inch_per_hour": "0.0",
  "forecastIcon": "6.0",
  "rxCheckPercent": "85.4166666667",
  "soilLeafAlarm4": "0.0",
  "pressure_inHg": "29.3092238355",
  "inTemp_F": "65.8",
  "soilLeafAlarm3": "0.0",
  "usUnits": "1.0",
  "soilLeafAlarm1": "0.0",
  "leafWet4": "0.0",
  "ET_in": "0.0",
  "txBatteryStatus": "0.0",
  "yearET": "0.0",
  "windSpeed_mph": "0.0",
  "rain24_in": "0.0",
  "dateTime": "1675216860.0",
  "sunset": "1675208220.0",
  "windSpeed10_mph": "0.0",
  "monthRain_in": "2.16"
}
So now we have data coming into AWS IoT Core, what’s next? In the next blog post, we’ll look at how we can use Grafana to visualize our data from WeeWX